Sunday, October 28, 2012

See Salary Online


Haryana Govt Employee Can See Salary Statement, GPF Statement, PRAN  etc online. 
If you are new user(i.e.have no user ID and Password) Then follow the following steps:
1.      Log on to intraharyana.nic.in
2.      Click on " New User Registration"
3.      A new window will open. Then fill the following information:
a.       Employee Type
b.      Date of Birth         
c.       Date of Joining     
d.      Salary Bank Account No
4.      After submitting the above information you will get User ID and Password on your given mobile phone.

If you already have User ID and Password, then log on to intraharyana.nic.in. A window as shown below will open. Then enter Your User ID and Password. Then click on login button.


A new window as shown below will open.


From here you can see Pay slip of any particular month, Annual Salary statement, Loan Payment status, Missing Cradit GPF, Previous GPF, Current GPF Detail, Service Book, ACR, Personal Detail etc.
From here you can also change your password.

Click Here: See your salary Detail

May we help you? 

If you have any problem click here 

Click Here : See your PRAN Statement

For Income Tax Calculating software: Download Income Tax Form Filling Software


Share:

Wednesday, October 10, 2012

How To Remove Number/Count from Archive in Blogger Dynamic Views

Here's the toturial on how to remove for Blogger Count (a Number) from Archive in Blogger Dynamic Views to look clean.

Befor you do this take to back up your Blogger Template.

First: Log in to your dashboard--> layout- -> Edit HTML

Two: Click on "Expand Widget Templates"

Three: Scroll down to where you see your "blog archive code:"

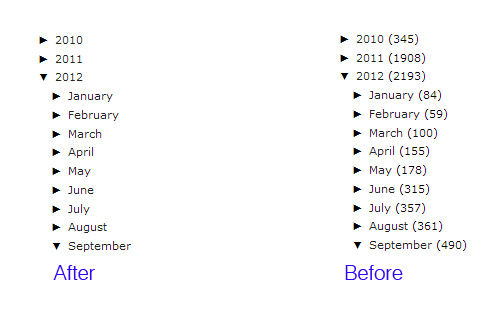
Note : Your blog archive code will look like this "After and Before."

How To Remove Number Count from Archive in Blogger Dynamic Views

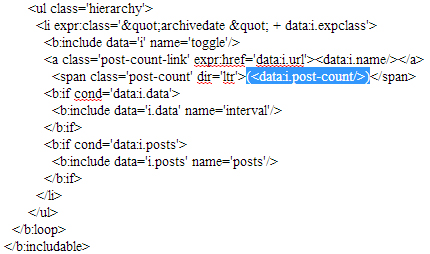
The thing you need to look is the blogger html code:

(<data:i.post-count/>)

You need to find 3 blogger html code.

How To Remove Post Number From Blog Archive
Share:

Monday, October 8, 2012

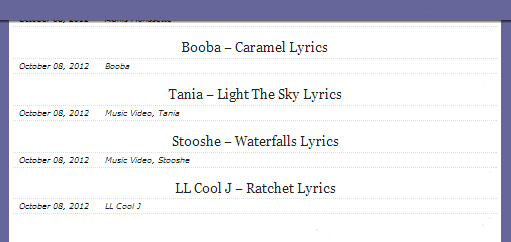
How To Center Post Title in Blogger Dynamic Views

Here's the tutorial' please make first a backup copy.

Just open the Template tab -> Edit HTML button.

Then find (Ctrl + f) the following code:

How To Center Post Title in Blogger Dynamic Views

Then find (Ctrl + f) the following code:
]]>

and REPLACE it with the following one:
h3.post-title { text-align:center; }

]]>

Click the PREVIEW button and you'll see that the post title is now centered. After that save your template and enjoy :)


Share:

AdSense will stop serving feed adds on December 3.

AdSense for feeds is going away. AdSense will stop serving feed ads on December 3.

AdSense for feeds (AFF)

AdSense for feeds is going away

After carefully evaluating the product, we�ve decided to retire the AdSense for feeds product.

The process will happen in two phases and your account will be affected, depending on your usage of the product. To check whether you�re currently generating any revenue from AdSense for feeds, run your �Products� performance report and review the listed products for recent data for "AdSense for feeds."

AdSense will stop serving feed adds on December 3

via: support.google
Share:

Sunday, October 7, 2012

Add Links In Blogger Dynamic Views Comments

Here's the simple tips on how to add comments "href tag" blogger dynamic views.

In writing your comment, you find that you need to post a link. Just how does one go about doing that? Well, it is fairly simple. This is the code you drop into the comment box:

The href attribute specifies the link's destination:

<a href="http://alljectsart.blogspot.com/">Alljectsart</a>

Take a look at my href html comments below.

blogger dynamic views
Share:

Display Gadgets Blogger Pages or Blogger Post and Website link

Hello guys here's the steps on how Display Gadgets Blogger Pages or Blogger Post and website link codes.

Post Specific Gadgets In Your Blog

Step 1. You must first have the post published and then add the gadget as normal dont forget to add the name example "alljects gadget."

Once the gadget is added you can move to the next step.

Step 2. In your dashboard Click 'Layout' > 'Edit Html' > Tick the 'Expand widget templates' box

Step 3. Now you want to find the gadget in your template so you look for the title of your gadget or "alljects gadget" if you used that name.

(The easiest way to do this is to click 'CTRL and F' for a search bar to help find the code - for more info on this Click Here.)

Step 4. Once you find the gadget it will look similar to the code below you can see the title "alljects gadget", the code displayed here is the entire code for the gadget:

<b:widget id='HTML1' locked='false' title='alljects gadget' type='HTML'>
<b:includable id='main'>
<!-- only display title if it's non-empty -->
<b:if cond='data:title != &quot;&quot;'>
<h2 class='title'><data:title/></h2>
</b:if>
<div class='widget-content'>
<data:content/>
</div>

<b:include name='quickedit'/>
</b:includable>

Copy the code in blue below and add it to the positions as shown:

<b:if cond='data:blog.url == "PUT-THE-POST-URL-HERE"'>

<b:widget id='HTML1' locked='false' title='alljects gadget' type='HTML'>
<b:includable id='main'>
<b:if cond='data:blog.url == "http://alljectsart.blogspot.com/2012/10/display-gadgets-blogger-pages-or-blogger-post-and-website-link.html"'>
<!-- only display title if it's non-empty -->
<b:if cond='data:title != &quot;&quot;'>
<h2 class='title'><data:title/></h2>
</b:if>
<div class='widget-content'>
<data:content/>
</div>

<b:include name='quickedit'/>
</b:if>
</b:includable>

Note you need Converts special characters to HTML entities. here

If you ever have a question or a suggestion for a post you can use the comments or the 'Contact me' form I'm always looking for suggestions.

How to Display Blogger Gadgets/Widgets in Labels - Homepage
Share:

Fastest Steps to Creat Blogger XML Sitemap

Here's the fastest way on how to create an xml sitemap for Blogger/Blogspot.

ctrlq.org XML Sitemap for Blogger is the answer, thanks to labnol.org

The steps is just put the link of your blogger site to ctrlq.org

example: http://alljectsart.blogspot.com

XML Sitemaps help search engines better index your blog or website. Sitemaps are supported by all major search engines including Google, Bing and Yahoo.

With the Blogger Sitemap Generator, you will be able to create a valid and complete XML sitemap for your blog. Just type the full web address (URL) of your blogger blog, press the Create button and then add the sitemap to Blogger.

The tool can generate Google XML Sitemap for Blogger hosted blogs (like labnol.blogspot.com) as well as self-hosted Blogger blogs (like postsecret.com) that run on Blogger.com but with a custom domain.

Internally, the tool parses the default XML sitemap to determine the total number of blog posts in your blog and splits them into multiple sitemaps each having 500 entries.


ctrlq.org XML Sitemap for Blogger, labnol.org
Share:

How to Active: Lightbox Image Viewer for Blogger

Here's oh how to activate light box for blogger.

Check out the very useful tutorial.

Blogger has recently added a new feature for image light box and photo light box on the blogger posts.

With the new Light-box feature, the images can be clicked and be displayed with a darkened background with in the smooth way.

About light box for blogger:

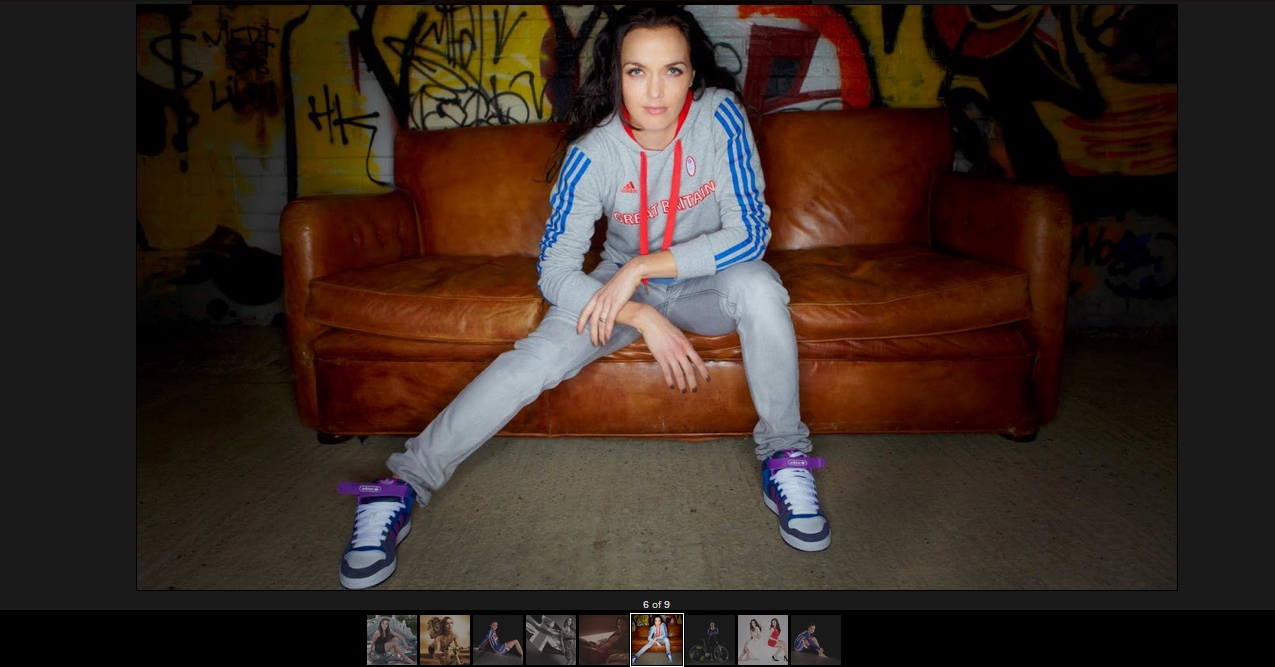
When clicked, your images will open in an overlay on top of your blog. If your post has multiple images, they will appear as thumbnails along the bottom.

How to Active: Lightbox Image Viewer for Blogger

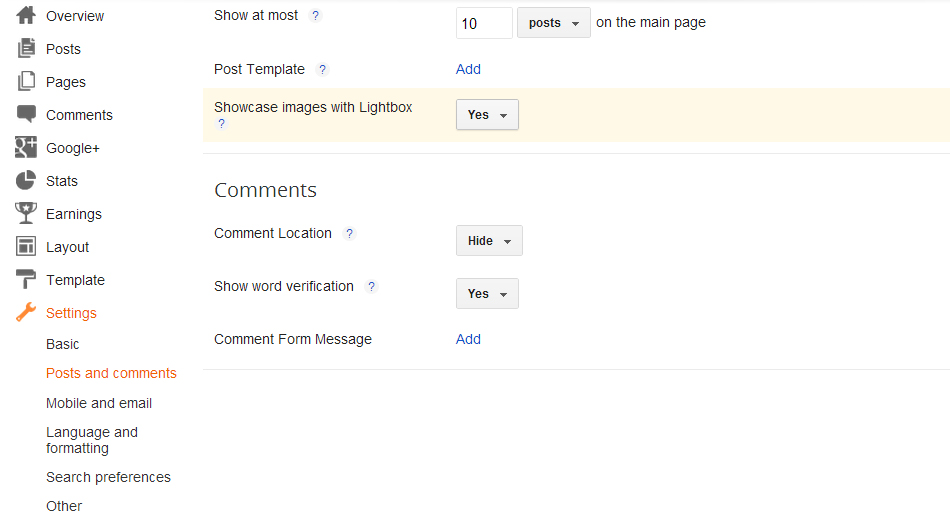
How to configure "images showcase with Lightbox".

Currently, Blogger blogs in default have "Open images with Lightbox" setting enabled. Go to Dashboard > Settings > Formatting.

Then you'll see the setting mode for Lightbox. Either yes or no.

images showcase with lightbox

It could seem rather annoying if readers unintentionally click on it. But if your blog is a photography blog, it's definitely suitable.

Have you try this?
Share:

How to Resize Blogger Wrapper Width

Here' the tips on how to change Blogger Blog Width.

Before you do this please take a backup of your Blogger Template.

To adjust the width size of your blog according to your preference, you can do so at the HTML section:


#header-wrapper {
width: 750px;
}

#outer-wrapper {
width: 750px;
}

#main-wrapper {
width: 490px;
}

#sidebar-wrapper {
width: 230px;
}

Header-wrapper and outer-wrapper determines the maximum width of your blogger template.

Main-wrapper determines the width of your blog content and sidebar-wrapper determines the width of your sidebar.

Have a look at the image below:

How to Resize Blogger Wrapper Width

Make sure that the total pixel (px) allocation for the main-wrapper and sidebar-wrapper is not more than the outer-wrapper's size.
Share:

Friday, October 5, 2012

Thursday, October 4, 2012

Facebook Hits 1 Billion Active Users

Facebook has officially reached one billion active users, and unveils new "Facebook Commercial Video."

In an official blog post, he writes:

This morning, there are more than one billion people using Facebook actively each month. If you�re reading this: thank you for giving me and my little team the honor of serving you.

Helping a billion people connect is amazing, humbling and by far the thing I am most proud of in my life. I am committed to working every day to make Facebook better for you, and hopefully together one day we will be able to connect the rest of the world too.

Facebook Hits 1 Billion Active Users
Share:

Monday, October 1, 2012

How to: Rounded Picture Post for Website or Blogger

Here's the tutorial on how to make rounded for picture post in Blogger Platform. Add Rounded corners to your photos,Images.

See the image below: The demo

If you're using the old Blogger interface: Go to Dashboard - Design - Edit HTML - Back Up (Download Full Template) -

If you're using the new Blogger interface: Go to Dashboard - Template - Backup/Restore - Download Full Template - Close - Edit HTML - Proceed -

Find for /* Posts ----------------------------------------------- */ - paste the following code directly below this line:

.post img, .post a img {
-moz-border-radius: 10px !important;
-webkit-border-radius: 10px !important;
-goog-ms-border-radius: 10px !important;
border-radius: 10px !important;
}
boaz 2012
Share:

Wednesday, September 26, 2012

Saturday, September 22, 2012

Sweet Pick Up Lines Tagalog

Here�s sweet pick up lines for your boyfriend and girlfriend tagalog.

Please leave your comment to make a best of the best Chane of Sweet Pick Up.

Just post your comment maybe its Romantic Pick Lines, Funny, Cute, cheesy, cheesy lines, funny quotes, funny tagalog lines, jokes, love lines, love quotes tagalog.. just post..

here some example of pure Tagalog pick up lines...

Wala akong bisyo� pero ng makilala kita di lang ako nag ka bisyo na adik pa ako�
Na adik ako sayo�

Pwede bang tumingin ka sakin kapag naka tingin ako sayo�
Para may pagtingin tayo sa isa�t isa�

Handa akong takbuhin ang mundo�
Basta ang finish line sa puso mo�

Mag impake kana punta tayo sa home for the aged kasi�
I wanna grow old with you�

Naka lunok ka ban g kwitis?
Pag ngumiti ka kasi may spark�

Pwede ba kitang abutin???
Pangarap kasi kita eh�.

Minamalat na naman ang puso ko..

*** paano kasi, laging sinisigaw ang pangalan mo..

Ikaw ba may-ari ng Crayola??
*** ikaw kasi nagbibigay ng kulay sa buhay ko..

Uy papicture tayo!!
*** para ma-develop tayo!!

Kung ikaw ay bola at ako ang player, mashushoot ba kita??
*** hinde, para lagi kita mamimiss..

Can i take your picture??
*** coz i want to show Santa exactly what i want for Christmas!!

Exam ka ba??
*** gustong gusto na kasi kitang i-take home eh!!
Share:

Tuesday, September 18, 2012

How to: Change Highlights colors of Default Blogger/WordPress or Website

Here's on how change the collor of Default (#3297fd) Blogger/WordPress/Joomla or Website.

Another way to impressed readers of your website is to have a customized blog Text Highlighting color, (I just search this on Bing website ..hehe). This can ensure that when users highlight text on your blog, it matches your blog�s theme, and may also look professional at the same time.

Check out the output here:

Note: Before you do a changes on your template, Take time and relax. Just Back Up Your Template!
How to: Change highlights colors of Default Blogger/WordPress or Website

Styling Text Highlight color In Blogger

1. Go To Blogger > Design > Edit HTML

2. and search for ]]>

3. Right above it, paste this code:

::-moz-selection {
Background:
#cb78a5;
color: #FFFFFF;
text-shadow: none;

}
::selection {
background:
#cb78a5;
color: #FFFFFF;
text-shadow: none;

}


Guys were' done

Tips:
Replace #cb78a5 with the highlight color
Replace #FFFFFF with the Font color. By default the font color appears white.

Related: Amazing Post Title Only in Blogger Platform
Share:

Sunday, September 16, 2012

How To: Change Border and Shadow from Blogger Dynamic View Images

Remove Border and Shadow from Blogger Dynamic View Images.

How to Remove, here's the simple instruction. I would to thanks Yogo for this hack.

Before you change the Blogger template please take a time to back up first.

The output of Dynamic view

If you're using the old Blogger interface: Go to Dashboard - Design - Template Designer - Advanced - Add CSS - paste the following code - Press enter after the last character of the last line } - Apply to Blog.

If you're using the new Blogger interface: Go to Dashboard ('House' symbol) - Template - Customize - Advanced - Add CSS - paste the following code - Press enter after the last character of the last line } - Apply to Blog.

.entry-content img{
box-shadow: none !important;
padding: 0px !important;
border: 0px !important;
}
Share:

Saturday, September 15, 2012

Change maximum number of posts Blogger Label List

Here' the tricks on how to change maximum number of posts blogger list label.

If you have a 1k post on a specific Label ex. (How To) in blogger, if you view 1k in one page the number of post that appear is only 25 if you have a time try to count (that is the deffault in old blogger.)

Lets start this.
Note before you do some changes on your blogger template, first do a back up.

Now you got to open the template editor (Dashboard > Template > Edit HTML). Tick [ ] Expand Widget Templates

Now use ctrl+F to help you find the following codes:

expr:href='data:label.url'                                            

Replace the above with the following (I used the number 150 because I want all posts to be displayed in the label page. You may use other numbers in place of 150):

expr:href='data:label.url + "?max-results=160"'           

Repeat this for all instances of expr:href='data:label.url' that you can find. I think for the Simple template, there will be 2 instances, so the above will have to be repeated 2 times. On Old blog the got 3 so you could repeat into 3 times.

Finally job will done, save it.

How to Attract Advertisers to your Site with your Google Adsense.
Share:

Thursday, September 13, 2012

Fanna Movie Shayari

Tere Dile mein meri saanson ko panah mil jaaye Tere Ishq mein meri Jaan Fanaa Ho jaayeā.

E Khuda Aaj Ye Faisla Karde,
Use Mera ya Mujhe Uska Karde.
Bahut Dukh Sahe He Maine,
Koi Khusi Ab Toh Muqadar Karde.
Bahot Muskil Lagta Hai Usse Duur Rehna,
Judai Ke Safar Ko Kum Karde.
Jitna Duur Chale Gaye Woh Mujhse,
Use Utna Kareeb Karde.
Nahi Likha Agar Nasib Me Uska Naam,
To Khatam Kar Ye Zindagi aur Mujhe FANAA Karde.


Ankhen to pyar me dilki zuban hoti hai,
sachi chahat to sada bezuban hoti hai,
pyar mai dard bhi mile to kya gabrana,
suna hai dard se chahat aur jawan hoti hai....

And More Shayari Related to This movie See Here Fanna Shayari
Share:

Wednesday, September 12, 2012

Kitni Mushkil Se Kati Kal Ki Meri Raat Na Pooch...

Kitni Mushkil Se Kati Kal Ki Meri Raat Na Pooch,
Dil Se Nikli Hui Honthon Mein Dabi Baat Na Pooch,
Main JisKe Waste Lad Jaoon Is Khudai Se,
Mujhe Khud Se Hai Pyari Yeh KisKi Zaat Na Pooch,
Wo Kis Ada Se Mere Samne Se Ghuzri Hai Abhi,
Kis Tarha Maine Sambhale Mere Jazbat Na Pooch,
Waqt Jo Badla To Insan Badal Jaata Hai,
Kya Nahi Dikhlate Yeh Gardish-E-Halat Na Pooch,
Woh KisKi Ho Bhi Gayi or Mujhe Khabar Na Hui,
Kis Tarha UsNe Chhudaya Hai MujhSe Haath Na Pooch,
Is Tarha Pal Mein Mujhe Begana Kar Diya UsNe,
Kis Tarha Apno Se Khai Hai Maine Maat Na Pooch,
Ab Tera Pyar Nahi Hai Tu Sanam Kuch Bhi Nahi,
Kitni Mushkil Se Bani Thi Dil Ki Kainat Na Pooch..!!!
Share:

Tuesday, August 28, 2012

How to: fix �blank ads� Google AdSense

How to fix Rejected ad requests or �blank ads �Google AdSense.  This problem happens one of my blogs/website. If this happen to your blogs with a thousand of post big money will losses to your website a day.

How to fix rejected ad request errors

When you see rejected ad request errors, it means your ad unit is crawling and targeting the wrong URL. This occurs when our URL detection has determined our ad unit is within an iframe, and has no content. This results in lower relevancy for your ads and lower revenue as we do not know the actual content of your page. When we are not able to determine the correct site information for an ad request, we serve �blank ads� that blend into the background of your pages.

According to support.google.com/adsense Reasons why you see rejected ad request errors:

Here are some possible reasons you're seeing these errors:
This occurs when the URL of the server from which the ad unit has been served differs from the URL of the actual page where the ad will be displayed.
Your ad code is nested within multiple iframes.
If your ad code is nested within multiple iframes, we are not able to determine the correct site information for an ad request.
You�re using a Supply-Side Platform (SSP).
If you make use of a Supply-Side Platform (ad servers, yield managers, etc.) for ad optimization and you're receiving rejected ad request errors with their URLs, please contact the Supply-Side Platform to determine the best way to ensure that the correct site information is passed in your ad requests.

Ways to fix rejected ad request errors

The method for fixing targeting depends on the domain that triggers the ad request error. In general, to fix these errors in AdSense and Ad Exchange, you will need to pass to AdSense and Ad Exchange, the URL of the actual page where your ad unit is located in the ad request.
If using DoubleClick for Publishers, please look into the following solutions:
  • If using DART, you can pass the correct URL using the dc_ref parameter in conjunction with the google_page_url parameter in AdSense and Ad Exchange. For more information, access the DART for Publishers Help Center .
  • If using Google Ad Manager, you can pass the correct URL by adding the following syntax to your DFP ad call:
GA_googleAddAdSensePageAttr("google_page_url", "URL");
  • If using Google Publisher Tags, you can pass the correct URL by adding the following syntax to your DFP ad call:
googletag.pubads().set("page_url", "URL");
  • If you have a mobile app, and are running AdSense and/or Ad Exchange web tags, you�ll need to switch those tags for the AdMob SDK.
If you have tag.admeld.com errors within your report, please contact your Admeld representative and ask for JavaScript tags as opposed to iFrame tags. This will remove the nesting iframe effect and should improve the targeting.
For all other domains, you will need to use google_page_url to target the correct URL.

Typical ad code:
<script type="text/javascript">
google_ad_client = "ca-pub-XXXXXXXXXXXX";
/* 728x90, creado 14/04/08 */
google_ad_slot = "XXXXXXXXXXXX";
google_ad_width = 728;
google_ad_height = 90;
</script>
<script type="text/javascript"
src="//pagead2.googlesyndication.com/pagead/show_ads.js">
</script>
Ad code with google_page_url added:
<script type="text/javascript">
google_ad_client = "ca-pub-XXXXXXXXXXXX";
/* 728x90, creado 14/04/08 */
google_ad_slot = "XXXXXXXXXXXX";
google_ad_width = 728;
google_ad_height = 90;
google_page_url = "http://myurl.com/fullpath";
</script>
<script type="text/javascript"
src="//pagead2.googlesyndication.com/pagead/show_ads.js">
</script>
Share:

Monday, August 27, 2012

How to: Align Center Post-Title for Blogger Blogspot

Here's the tutorial on how to align the Post title in Blogger Blogspot template. Actually the Post title by default in Blogspot template is align in the left side.

Now you can place(Center or Right) by making/adding few changes in your blogger's HTML source code.

Step 1. First Sign-in to your Blogger click on Design under the Design Tab you will see Edit HTML click on it see below. befor you do this take a time to back-up your Blogspot template.

How to Align Center Post Title for Blogger Blogspot

Step 2: Find the Below Code ( By preshing Ctrl+F ) Put the code inside the serch box than Enter.

header {


Step 3: Under the header { find the code h1 { by moving your mouse cursor a little down and find h1 { see below.

Step 4: Now just add the below code under the h1 { code.

text-align: center;

Final: It will look like see below.

h1 {
text-align: center;
padding:25px 0px 10px 5%;
color:$pagetitlecolor;
background:$pagetitlebgcolor;
font:$pagetitlefont;
letter-spacing:-2px;

See demo here:

Tips:- If yuo want to take blog header title in right side just change in the code like.

For right side code: text-align: right;

For Left side code: text-align: left; (or remove the code)

For Center code: text-align: center;
Share:

Google's 'I'm feeling lucky' Spinning emotion

Google Search today got a new Spinning emotion, When you hover over the I'm Feeling Lucky button. Try it now.

From Google+:

Yesterday, we asked you how you're feeling and by far, the most popular answer was "hungry"! What does this have to do with Google Search, you ask? We recently added some other emotions to our I'm Feeling Lucky button, like artistic, wonderful, and of course, hungry. When you hover over the I'm Feeling Lucky button, it spins to an emotion and clicking on it connects you to a page that reflects that emotion. For instance, I'm Feeling Hungry leads you to a Google results page for restaurants in your area. Bon appetit!

 Google's 'I'm feeling lucky' Spins to an emotion
Share:

Sunday, August 26, 2012

Neil Alden Armstrong dies, age 82

Neil Alden Armstrong, the first man on the moon, has died. He was 82.

He died at 2:45 p.m. Saturday after complications following cardiac bypass surgery. RIP.

The report:


Neil Alden Armstrong dies, age 82
Image by creativeplanetnetwork.com
Share: